There was a morning when I opened my garage, only to be greeted by a sight that made my stomach tighten—a tiny, yet stubborn micro-dent on my car’s aluminum hood. It was just a little ding, but enough to ruin the sleek look I loved. I know I’m not alone in this; many car owners face the frustrating challenge of repairing these almost invisible dents, which often seem impossible to fix without costly repainting.
The Real Struggle with Micro-Dents
For years, I believed that such minor damage was a lost cause—something only a professional paint job could fix. However, I stumbled upon a game-changing approach in Collisionrenew’s collision repair tactics, specifically tailored for aluminum panels. This discovery was a lightbulb moment for me, transforming how I see small damages and their repair process.
Is Salvaging Aluminum Hoods Worth the Effort?
When I first heard about micro-dent repair, I was skeptical. It sounded too good to be true, and I worried about making things worse. Early on, I made the mistake of trying to pry out dents without proper technique, which only exacerbated the damage. But with the right knowledge, I found that repairing these micro-dents is not only feasible but also affordable and effective. If you’ve ever hesitated because you thought these dents were unfixable, I can tell you—you’re not alone, and there’s hope.
By learning the proper collisionrenew methods, I’ve been able to restore my hood’s appearance without repainting, saving both time and money. Whether you’re a DIY enthusiast or considering professional help, understanding these tactics is crucial. Curious to see how I tackled my micro-dent? Stay with me, because I’ll walk you through the essential steps that transformed my approach—and can do the same for you.
Let’s dive into the tips, tricks, and expert insights that will help you salvage your aluminum hood and keep your car looking its best.
into=
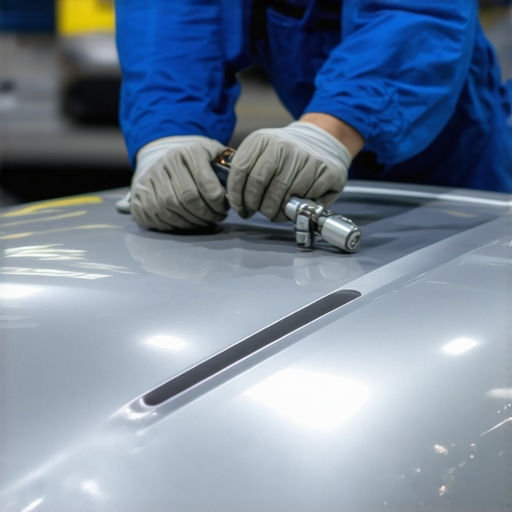
Gather the Right Tools and Prepare Your Workspace
Before diving into the repair, assemble essential tools: a hot glue gun, a dent pulling tab kit, a spray bottle with soapy water, a plastic pry tool, and plenty of patience. Find a well-lit, vibration-free workspace—think of it as setting the stage for a surgical procedure. Clean the area around the dent thoroughly to remove dirt and grease, ensuring no debris hampers the repair process. I once tried to rush this step in my garage, but dust and grease made the glue bonds weak, leading to multiple re-dos—so take your time here.
Apply Heating to Loosen the Aluminum
Gentle heating is crucial. Use a heat gun to warm the dented area evenly for about 2-3 minutes. Think of it as warming wax before shaping: the hotter the surface, the more malleable it becomes. Be cautious—avoid overheating to prevent damage. Once heated, immediately spray the area with soapy water; this acts as a lubricant, allowing the glue to bond better. During my first attempt, I underestimated this step, and the glue didn’t hold, which was frustrating but a good learning point.
Attach the Pulling Tab and Extract the Dent
Place the dent pulling tab onto the center of the dent, pressing firmly to ensure a good bond. Use the hot glue gun for adhesion, applying a steady stream of glue beneath the tab, similar to gluing a patch onto fabric—consistent pressure ensures a secure hold. Let the glue cool for about a minute. Then, attach your dent pulling tool to the tab and gently start pulling—think of it as lifting a stubborn nail from wood. During my trial, applying slow, steady tension prevented damage—rushing can cause additional dents or cracks.
Refine the Shape and Address Residual Dents
After removing the tab, evaluate the surface. Use fine-grit sandpaper or a plastic pry tool to smooth out any high spots or leftover imperfections. Sometimes, small dents require a second pull—repeat the process, adjusting the heat and glue application as needed. I recall doing a second pull after noticing a faint impression, which restored the surface almost perfectly, avoiding the need for repainting.
Final Touches and Preservation
Once satisfied, clean the area with a microfiber cloth to remove any glue residue. Applying a light coat of automotive polish can help blend the repaired area with the rest of the hood. Keep in mind that patience during each step ensures a seamless repair. For more advanced tricks, consider learning about< a href="https://collisionrenew.com/how-collisionrenew-matches-pearl-white-paint-without-painting-the-whole-car" target="_blank">collisionrenew’s paint matching techniques to keep your repair invisible. With these steps, micro-dents no longer have to be a cause for panic—think of it as cosmetic surgery for your car that you can perform at home with confidence.
Debunking the Myths Surrounding Quick Fixes
One of the most persistent misconceptions is that car repairs can always be quick and straightforward. Many believe that replacing a part or adding a fluid will instantly solve complex issues, but in reality, auto repair often involves a layered process requiring attention to nuanced details. For instance, a common myth is that brake pads are the sole culprit for squeals—the reality is that worn rotors or even contaminated brake fluid can also cause noise, and addressing only the pads might be a temporary fix. Recognizing these intricacies is part of mastering advanced auto repair practices.
Why Overlooking Small Details Can Cost You Big
Many car owners and even some technicians underestimate the importance of small factors, such as proper torque settings or corrosion levels. Over-tightening lug nuts, for example, can warp rotors, leading to uneven braking and increased wear, which could have been prevented with precise torque application. Similarly, ignoring minor leaks in transmission seals might seem insignificant initially but can escalate into costly failures. Collisionrenew emphasizes that paying close attention to these hidden details results in more reliable and longer-lasting repairs.
Common Mistakes in Transmissions and How to Avoid Them
Transmissions are intricate systems, and a prevalent error is neglecting regular fluid changes. Many assume that transmission fluid lasts the lifetime of the vehicle, but contaminants and degraded viscosity can cause slipping and overheating. Studies show that proactive maintenance extends transmission life significantly. For example, checking and replacing fluid at recommended intervals, especially after towing or severe driving conditions, can prevent failures. Be sure to consult expert sources or trusted guides to understand the specific needs of your vehicle’s transmission system.
Here’s a quick tip on maintaining your transmission—a dirty air filter can indirectly affect shift quality by reducing engine efficiency, leading to increased stress on your transmission. Remember, small overlooked factors often compound into large issues if neglected over time.
Navigating Car Service and Repair with Confidence
One more hidden nuance is understanding when to seek professional help versus attempting DIY repairs. While minor tasks like changing windshield wipers or topping off fluids are simple, more complex issues—such as diagnosing transmission slips or repair of collision damage—are best handled by experts with proper tools and diagnostic equipment. Collisionrenew advocates for educating yourself about these boundaries to avoid costly mistakes and ensure safety.
Have you ever fallen into this trap? Let me know in the comments. Mastering these hidden nuances not only saves money but also enhances your confidence in maintaining your vehicle properly. Remember, these details often separate mediocre repairs from those that truly restore your car’s health and performance.
How do I keep my car running smoothly over the years
Maintaining your vehicle’s performance isn’t just about fixing the immediate problem—it’s about investing in the right tools and adopting methods that ensure long-term reliability. Over the years, I’ve honed a toolkit that balances DIY practicality with professional accuracy, allowing me to tackle everything from minor hiccups to more complex repairs.
Prioritize quality diagnostics with advanced software
One of my favorite investments is an OBD-II scanner that connects to my smartphone. Not all code readers are created equal—I’ve found that high-quality diagnostic tools with live data streaming save me hours of guesswork. They alert me to issues before symptoms become severe, especially important for components like the transmission, where early detection can prevent costly failures.
Keep a dedicated set of precision hand tools
Reliable repair often hinges on choosing the right hand tools. I opt for a set of metric and imperial ratchets, screwdrivers, and specialty tools like a torque wrench for securing components like brake calipers or wheel lug nuts. Using a precision torque wrench ensures I don’t under-tighten or overtighten parts, extending their lifespan and maintaining safety.
Use heat guns and infrared thermometers for delicate work
Applying the correct amount of heat during dent repair or component removal can make all the difference. I personally favor infrared thermometers to monitor surface temperatures, ensuring I avoid overheating sensitive parts. When re-aligning panels or loosening stubborn bolts, a quality heat gun speeds up the process and reduces the risk of damage.
Invest in clean, organized workspaces and maintenance supplies
Long-term care isn’t just about tools; it’s about environment. Keeping my workspace tidy with labeled containers for bolts, lubricants, and cleaning supplies makes repairs efficient. Regularly cleaning and inspecting tools prevents corrosion and ensures they perform precisely when needed.
Progressing Towards Smarter Repairs
Looking ahead, I predict that integrated diagnostic apps paired with AI will make troubleshooting even more accurate and faster. Advancements in portable 3D scanning and material-specific testing devices will empower DIY enthusiasts and professionals alike to diagnose issues more confidently.
What’s the best way to maintain your auto repair tools over time?
Proper storage and regular calibration are key. Keep your tools clean, dry, and organized—use protective cases and avoid exposure to extreme temperatures. Calibrate precision instruments such as torque wrenches annually, following manufacturer instructions. This attention to detail ensures your tools remain reliable, saving you from unnecessary frustration during critical repairs.
As a tip, always test new tools on less critical components first. For example, before working on your transmission, familiarize yourself with your diagnostic scanner and calibrate your torque wrench using a known weight or setting. This approach helps prevent accidental damage and builds confidence, especially when performing tasks like adjusting transmission components.
If you’re ready to level up your repair game, start by selecting a high-quality diagnostic tool or precision torque wrench—these investments will pay dividends in durability and confidence. Embrace the right tools, maintain them diligently, and your vehicle will thank you for years to come.
The Hardest Lesson I Learned About CollisionRenew and Aluminum Dent Repair
- I once believed that only professional repainting could fix micro-dents on aluminum surfaces, but discovering collisionrenew’s techniques taught me the value of careful, targeted repairs that preserve your car’s original finish.
- Patience and proper heating are crucial; rushing the process can worsen the damage, as I painfully realized during my initial attempts.
- Investing in quality tools and learning the nuances of aluminum’s properties transformed my DIY approach from a gamble to a confident craft.
- Understanding that small details—like thorough cleaning and precise glue application—make all the difference, prevents costly mistakes and ensures a seamless repair.
- By focusing on these lessons, I’ve not only saved money but also gained a deeper appreciation for maintaining my vehicle’s aesthetic integrity.
My Essential Tools for Aluminum Micro-Dent Restoration
- A high-quality hot glue gun and dent pulling tabs—reliable and easy to control, they form the backbone of effective repair.
- An infrared thermometer—crucial for monitoring temperature during heating, ensuring safety and proper malleability.
- Fine-grit sandpaper and plastic pry tools—perfect for smoothing residual imperfections without damaging delicate aluminum surfaces.
- An automotive polishing compound—helping to blend the repair seamlessly with the rest of your hood’s finish.
- These tools have personally helped me achieve professional-looking results, proving their worth every time I repair a micro-dent.
Embrace Your Repair Journey and Keep Improving
Taking control of small car repairs can be an empowering experience. Each successful micro-dent fix boosts confidence and deepens your understanding of your vehicle. Remember, the key is patience, attention to detail, and a willingness to learn from each attempt. Pursuing these repairs not only preserves your car’s appearance but also fosters a sense of pride in maintaining your ride. So go ahead—grab your tools, follow the proven steps, and transform micro-dents into mere memories. What’s the first small repair on your wishlist? Share your goals below and let’s cheer each other on in the journey of auto mastery! For advanced techniques, explore collisionrenew’s [how collisionrenew matches pearl white paint without painting the whole car](https://collisionrenew.com/how-collisionrenew-matches-pearl-white-paint-without-painting-the-whole-car) to keep your repairs perfectly invisible.