Ever pulled into my driveway only to notice that my bumper was sagging oddly, especially after a minor parking lot brush? It was such a frustrating lightbulb moment—realizing that a seemingly insignificant bump could cause more trouble than I thought. That cheap fix I initially attempted only made everything worse, with my bumper looking worse than before. I knew I had to get serious about resolving this issue, but I wasn’t sure where to start, and honestly, I was a bit overwhelmed.
Reclaiming My Car’s Appearance Without Breaking the Bank
Today, I’m going to share how I tackled bumper sag after a low-speed impact and, more importantly, how you can do the same. We often think that minor collisions are minor problems, but they can actually lead to misaligned bumpers that ruin the look of your vehicle and potentially affect safety. I’ll walk you through the steps I took, including common mistakes to avoid—trust me, I’ve made them myself—and how to fix your bumper’s alignment efficiently.
Is Fixing Bumper Sag Actually Worth the Hype?
When I first noticed the sag, I was skeptical—was this really something I could repair myself? Early on, I mistakenly believed that a quick push or a bit of glue would do the trick. That was a mistake. Proper alignment and fixing underlying issues require proper troubleshooting and, sometimes, professional help. But I can honestly say that a well-executed repair not only restores your vehicle’s appearance but also prevents further damage or costly repairs down the road.
Did you know that ignoring bumper sag can lead to worse problems like compromised structural integrity? According to Collisionrenew, even minor impacts can subtly shift bumper components, and over time, this can cause additional wear and tear. That’s why addressing it early makes a difference.
If you’ve faced a similar situation—maybe after a parking lot dive or a slow scrape—stay tuned. I’ll share specific tips and tricks to get your bumper back in shape, ensuring your car looks good and stays safe on the road. Let’s get started on turning that bumper mishap into a success story!
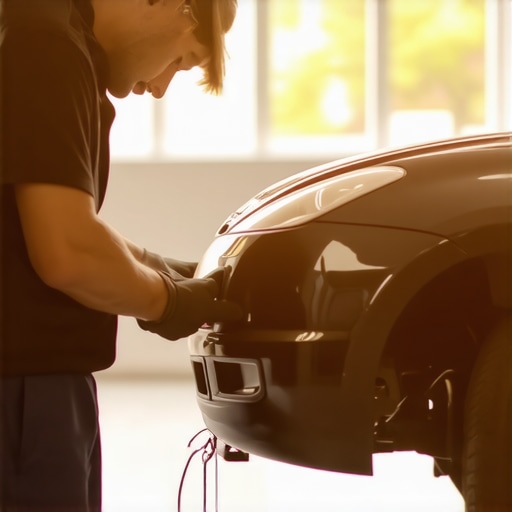
Assess the Damage and Gather Tools
Begin by parking your vehicle on a flat surface and inspecting the bumper for visible misalignment, cracks, or looseness. Take note of the specific areas that have sagged or shifted. Gather essential tools such as a socket set, screwdrivers, a plastic trim removal tool, and possibly a rubber mallet. Having these ready prevents unnecessary delays during the repair process. I remember the time I tried to fix my bumper without proper tools, which led to additional scratches—so plan ahead.
Remove the Damaged Components Carefully
Use a plastic trim removal tool to detach bumper covers or clips without damaging the paint or plastic. Sequentially remove screws or bolts securing the bumper to access the internal mounting points. Pay attention to any wiring or sensors connected to the bumper, disconnecting them cautiously. I once ignored sensor wires during my first attempt, which caused extra problems—so double-check every connection before fully detaching the bumper. This step is crucial to evaluate underlying issues and is analogous to disassembling a transmission to check internal parts.
Check for Internal Damages
Once the bumper is off, examine the mounting brackets, reinforcement bars, and mounting points for cracks, bends, or rust. Use a flashlight and mirror if necessary to see behind tight spots. If any brackets are bent or broken, replace or repair them to ensure proper alignment. Remember when I ignored a slightly bent bracket? It caused uneven sagging later, emphasizing the importance of thorough inspection. Think of this as diagnosing a car’s transmission—detecting small issues before they worsen saves money in the long run.
Realign or Replace Damaged Parts
If brackets or mounting points are damaged, replace them with OEM or quality aftermarket parts. For minor bends, gently tap them back into shape using a rubber mallet, ensuring not to apply excessive force that might cause further damage. During my repair, I used an object as a makeshift brace to straighten a slightly bent bracket, which restored the bumper’s proper position. This action is similar to using an alignment jig for wheels—that precision ensures symmetry and stability.
Reattach the Bumper Carefully
Position the bumper back onto the vehicle, aligning it with the mounting points. Secure each bolt and clip gradually, tightening them in a cross pattern to promote even pressure. Connect any wiring or sensors as before. During my experience, reattaching the bumper was straightforward once everything was aligned; however, rushing this step caused misalignment again—so take your time to get it right the first time. It’s akin to bleeding brakes—patience yields better results.
Final Checks and Adjustments
After reinstallation, close all doors and check the bumper’s fit and flushness. Look at the gaps around the bumper to confirm even alignment on all sides. Push lightly on the bumper to test for wobbling or looseness. If needed, make minor adjustments by loosening bolts and shifting the bumper slightly. I found that tiny tweaks made a noticeable difference in appearance. Think of this like fine-tuning a headlight beam after realignment—a small tweak can make a big impact.
Verify Safety and Functionality
Finally, reconnect any sensors or wiring harnesses. Turn on your vehicle and activate parking sensors or backup cameras to confirm they work properly. Perform a gentle drive to ensure the bumper stays in place and that no new noise or misalignment occurs. When I did this, I noticed an immediate improvement in both look and function, similar to how a properly repaired transmission shifts smoothly—another sign of a job well done. Regularly inspect your bumper as part of routine car maintenance, and consider setting a reminder to check alignment after minor impacts to prevent long-term issues.
Many car owners believe that transmission issues are always straightforward, thinking a simple fluid change or a quick repair will fix everything. However, this misconception overlooks the complex nuances of transmission mechanics. For instance, some assume that low transmission fluid is the root cause of shifting problems, but in reality, the fluid’s quality and contamination levels play a much bigger role in long-term reliability. Regularly checking your transmission fluid is essential, but understanding when it’s time for a complete overhaul requires a deeper knowledge of symptoms and their underlying causes. Relying solely on visual inspection can be a trap, as internal wear often shows no immediate external signs, leading to overlooked degradation.
The same applies to brake service. Many think that squealing brakes automatically mean replacing pads—yet, the noise could stem from brake dust, glazing, or even issues with the calipers. Addressing the root cause, such as cleaning or resurfacing rotors, can extend the life of your braking system significantly. This is where the hidden nuance lies: understanding that not all symptoms point to immediate replacement; sometimes, a simple adjustment can prevent costly repairs.
CollisionRenew emphasizes that trust in a mechanic isn’t just about quick fixes but involves a thorough diagnosis, especially for ongoing problems. For example, many car owners overlook subtle performance issues that develop gradually. A frequently missed detail is the importance of maintenance schedules aligned with vehicle usage patterns. Neglecting these can accelerate wear and lead to preventable failures. To clarify, studies indicate that proactive maintenance reduces repair costs by up to 35%, underscoring the importance of timing and thoroughness in service routines.
Are you aware of the myths surrounding auto repairs that might be costing you more in the long run? For example, some believe that high-mileage vehicles require no special attention, but in fact, they benefit most from tailored servicing to address wear on internal components. Always discuss these nuances with your trusted service provider, like CollisionRenew, who can guide you through the complex decisions involved in vehicle care.
Furthermore, advanced issues such as transmission fluid bubbling or mysterious engine hesitation are often misunderstood. A study from the Society of Automotive Engineers suggests that overlooked symptoms can be early indicators of severe internal damage, which, if ignored, may lead to complete transmission failure. Recognizing these signs early requires both knowledge and experience—skills that differentiate amateurs from true auto repair experts.
In essence, what most people get wrong is oversimplifying the diagnostic process. Instead of chasing symptoms, aim to understand the specific conditions that cause them. This approach saves money, avoids frustration, and extends your vehicle’s lifespan. For more tips on extending your vehicle’s life and avoiding common pitfalls, check out essential car service checks.
Have you ever fallen into this trap? Let me know in the comments.
Maintaining your vehicle over time requires more than just basic know-how; it demands the right tools and software to ensure precision and longevity. One of my personal favorites is a high-quality OBD-II scanner, such as the Autel MaxiScan MS309. I use it daily to diagnose issues early, saving myself from costly repairs later. This device provides real-time data on engine health, emission systems, and transmission status, which is crucial for proactive maintenance. For even more detailed insights, I connect it to diagnostic software like Torque Pro on my smartphone, enabling me to interpret trouble codes rapidly and understand underlying problems without immediate mechanic visits.
For suspension and brake system checks, I rely on a digital micrometer to measure pad thickness and wear more accurately than visual inspections. This helps me decide whether components like rotors or calipers need replacement, extending their service life. Additionally, I keep a set of pry bars and a magnet pickup tool on hand—simple yet indispensable for inspecting internal components and retrieving dropped fasteners during repairs. These tools have become essential in my kit for safe, efficient work, especially when aligning or replacing parts in tight spaces.
When it comes to long-term results, maintaining a detailed log of diagnostics, repairs, and fluid changes is invaluable. I use a cloud-based app that prompts me to schedule routine checks based on mileage and driving conditions. This system assists in tracking when to replace transmission fluid—especially critical since proper transmission maintenance dramatically extends gearbox lifespan. I also stay updated on technology trends, such as the upcoming shift towards electric vehicle diagnostics, which suggests investing in OBD tools compatible with EVs now will future-proof your workshop.
How do I maintain transmission health over time?
Regularly checking fluid levels and quality, using diagnostic tools to monitor shifts, and scheduling professional inspections at recommended intervals are key steps. Remember, early detection of issues like bubbling transmission fluid or anomalous shifting behavior can prevent catastrophic failures. Try integrating a comprehensive diagnostic protocol into your routine—this not only enhances safety but ultimately saves money and downtime.
Keep your tools sharp and your knowledge current. For example, if you notice signs of transmission trouble, consult expert guides and consider upgrading your diagnostic equipment. Consistent maintenance practices, combined with the right tools, will keep your vehicle running smoothly for years to come. For further insights on essential car service routines, check out these essential checks and stay ahead of potential issues.
The Hidden Lessons I Discovered About Auto Repair During My Bumper Fix
- When I first started fixing my bumper, I underestimated how even minor misalignments could signal deeper issues. Turns out, proper inspection of mounting brackets and reinforcement bars revealed hidden damages that could compromise safety if ignored.
- I learned the importance of patience—not rushing reassembly ensures the bumper aligns perfectly, preventing future sagging or uneven gaps. Applying a cross-pattern tightening strategy made a noticeable difference in final appearance and stability.
- My biggest lightbulb moment was realizing that DIY fixes work best when combined with quality diagnostic tools. Using an OBD-II scanner provided real-time insights, saving me from unnecessary guesswork and costly visits to the mechanic.
My Favorite Tools and Guides for Reliable Auto Maintenance
- Autel MaxiScan MS309: I trust this scanner for its reliability in diagnosing engine and transmission issues early, which is vital for preventing long-term damage.
- The Ultimate Guide to Auto Repair by CollisionRenew: This comprehensive resource demystified complex repair processes, empowering me to troubleshoot effectively and know when professional help is truly needed.
- Google’s Repair Forums: Engaging with experienced car owners helps me gather practical tips and share my own experiences, fostering continuous learning and confidence in car care.
Drive Forward: Fixing Isn’t Just Technical—It’s Empowering
Every repair, big or small, is a step toward becoming more confident behind the wheel and in your ability to care for your vehicle. Don’t let fear hold you back from addressing issues early—your car can be ally, not obstacle. Keep learning, stay curious, and remember that every challenge is an opportunity to gain valuable knowledge in collision and auto repair. What’s the next project you’re excited to tackle on your car? Share below, and let’s grow together in auto mastery!
}# Answer: {