I remember the exact moment I realized my headlights were off-kilter after a gentle bump in the parking lot. It wasn’t even enough to leave a visible dent, but suddenly, driving at night felt like navigating in fog. That small jolt made me feel vulnerable on the road—an uneasy feeling that prompted me to get to the bottom of it. It’s surprisingly common; often, a minor tap causes more misalignment than we expect, and many drivers just ignore it, thinking it’s a trivial issue.
Why a Small Impact Can Disrupt Your Headlight Alignment
Our car’s headlights are designed to be precise, guiding your way and signaling to others. But all it takes is a tiny hit—perhaps in a crowded parking space or a low-speed bump—to shift the delicate adjustment of your headlight beams. This misalignment isn’t just a minor inconvenience; it can significantly reduce your visibility and increase the risk of accidents. Over time, such misaligned beams can even cause your headlights to glare oncoming drivers, creating a safety hazard for everyone on the road.
Many people overlook this subtle change, assuming that headlights will naturally stay aligned. However, the reality is that headlight adjustments are sensitive, and even minor impacts can throw them off. As I learned early on, neglecting this issue doesn’t just impact your lighting quality—it can also lead to more costly repairs down the line. That’s why addressing headlight realignment promptly is so important for your safety and peace of mind.
Is It Really Worth the Hassle? Think Twice Before Ignoring It
Initially, I thought I could just ignore the misalignment and rely on brighter bulbs or better bulbs. Big mistake. According to a recent study by the AAA Foundation for Traffic Safety, improperly aligned headlights are responsible for numerous nighttime accidents. Plus, I made the classic mistake of assuming it was something I could fix myself without proper tools or instructions. My inexperience led to some frustration and a few more missteps—proving that, sometimes, knowing what you’re doing truly makes all the difference.
If you’ve ever faced similar doubts—whether a slight tilt or a dimmer beam—you’re not alone. I’m here to tell you that realigning your headlights after a minor bump is easier than you think, and I’ll walk you through it step by step. Once you get it right, the improved visibility and safety make every moment on the road so much better. Ready to regain your confidence behind the wheel? Let’s dive into how you can fix this yourself and see clearly once more.
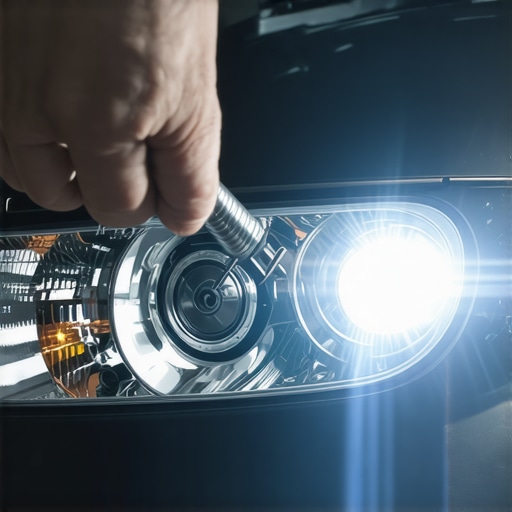
Start with a Clean and Level Surface
Park your car on a flat, level surface away from direct sunlight. Engage the parking brake to prevent movement. Clean the headlight lenses with a soft cloth to ensure clear visibility during adjustment, reducing any dirt or grime that might interfere with the process.
Locate Adjustment Screws and Prepare Your Tools
Identify the adjustment screws—usually accessible from the engine bay or the front grille. They are often marked with symbols or colored caps. Gather a screwdriver or a wrench depending on the screws used on your vehicle. Refer to your vehicle’s manual for specific locations and tools. Consult your manual if unsure.
Measure Your Headlight Aim
To ensure proper alignment, measure the distance from your headlights to a wall—generally about 25 feet. Mark the vertical and horizontal centers of each headlight on the wall using painter’s tape. This will serve as your target for adjustment. Use tape to create a reference cross that matches the height of your headlights.
Adjust the Vertical Beam
Turn the vertical adjustment screw clockwise or counterclockwise to raise or lower the headlight beam. You want the brightest part of the beam to align just below your tape mark without blinding oncoming drivers. Test adjustments by turning on your headlights and observing the pattern on the wall. Remember, small turns make a big difference, so adjust gradually.
My experience: During my first attempt, I over-rotated the screw and then had to dial it back—best to make tiny adjustments and test frequently to avoid going too far.
Adjust the Horizontal Beam
Use the horizontal adjustment screw to shift the beam left or right. Aim to keep the highest point of the light pattern centered with your tape cross or slightly toward the outside edge of your marker. Proper alignment ensures optimal visibility without causing glare for other drivers.
Test Drive and Fine-Tune
Once adjusted, take a test drive in low-light conditions. Check how well the headlights illuminate the road and whether they threaten to blind oncoming traffic. If needed, revisit the screws for minor tweaks. After adjusting, revisit the wall markers to confirm accuracy.
Verify Proper Alignment Periodically
Headlight alignment can shift over time due to vibrations or minor impacts. Recheck your alignment every few months or after any significant impact or accident. Properly aligned headlights not only improve your visibility but also keep you compliant with safety regulations.
Applying these steps corrected my own misaligned headlights after a minor parking lot bump, dramatically improving night driving safety. Remember, proper headlight alignment isn’t a one-time fix; it’s part of regular vehicle maintenance. For more detailed vehicle care, visit Collision Renew’s comprehensive repair strategies.
When it comes to collision repair and general auto maintenance, many car owners operate under misconceptions that can lead to costly mistakes. Let’s dig deeper into some nuances that often go unnoticed, despite the abundance of advice available online. A prevalent myth is that all collision damage is visibly obvious, encouraging owners to delay repairs. However, subtle frame distortions or misaligned components, like steering racks or suspension parts, can cause uneven tire wear or poor handling, which might only be evident after long-term use. Recognizing these hidden issues is crucial for professional repair strategies. Moreover, many believe that minor impacts don’t warrant professional inspection, but even low-speed collisions can trigger alignment issues or compromise safety features like airbags if sensors are displaced. Always consider a comprehensive check after any impact, regardless of how insignificant it seems.
Are Alignment and Frame Repairs Always Necessary After Small Collisions?
Another misconception revolves around DIY fixes—some drivers attempt to realign or repair parts themselves, confident in their mechanical skills. While simple tasks like replacing brake pads or oil changes can be tackled at home, complex repairs such as transmission service or addressing structural damage require specialized tools and expertise. Inappropriate DIY fixes not only risk insufficient repairs but can also void warranties or cause further damage, leading to higher costs down the line. An advanced nuance is understanding the importance of using the right diagnostic tools for modern vehicles equipped with electronic stability control, adaptive cruise control, and other driver-assist systems. These systems rely on precise sensor calibration, which, if neglected after a collision, can affect vehicle safety and performance. According to a study by the Vehicle Research Institute, improper calibration of sensors can diminish the effectiveness of safety systems by up to 60%, emphasizing the need for specialized recalibration procedures. For those seeking reliable car service, it’s vital to engage technicians who are well-versed in these modern diagnostics. To truly maintain your vehicle’s longevity and safety, consulting comprehensive guides on [auto repair](https://collisionrenew.com/the-ultimate-guide-to-auto-repair-keep-your-car-running-smoothly) and [transmission maintenance](https://collisionrenew.com/top-transmission-repair-tips-for-long-term-vehicle-reliability) can be invaluable. Remember, understanding these hidden nuances helps you avoid pitfalls and ensures your car remains safe and reliable. Have you ever fallen into this trap? Let me know in the comments.
Essential Tools for Long-Term Car Maintenance
Having the right equipment is crucial to maintaining your vehicle’s health over the years. I personally swear by a quality automotive multimeter, like the Fluke 117, for diagnosing electrical issues quickly and accurately. It’s portable, reliable, and provides precise voltage readings, saving me hours of guesswork. For fluid inspections, a transparent catch basin coupled with a siphon pump makes fluid changes or checks cleaner and more manageable. Always using SAE-certified tools ensures safety and accuracy, which is why I stick with trusted brands like Craftsman or Snap-On for my socket sets and screwdrivers.
Software Solutions That Save Time and Money
Modern vehicle diagnostics hinge on software. I recommend investing in a high-quality OBD-II scanner such as the BlueDriver or Innova 3160. These tools connect wirelessly to your smartphone, providing real-time data and comprehensive error reports right on your device. I use the BlueDriver app not only to diagnose check engine lights but also to monitor sensor data during test drives, giving insights into issues like transmission slipping or sensor malfunctions, which are vital for proactive maintenance. Regularly updating your scanner’s firmware is essential; I make it a habit to check for updates monthly to stay ahead of vehicle advancements.
Establishing a Routine for Long-Term Results
Consistency in maintenance pays off. I set reminders every 3,000 miles for oil changes, tire rotations, and fluid checks—this habit keeps minor issues from becoming costly repairs. Documenting maintenance with digital logs enables me to track patterns, spot potential problems early, and communicate effectively with mechanics. Investing in a portable battery jump starter, like the NOCO Boost Plus, is also a game-changer for avoiding roadside emergencies. Regularly inspecting and testing the health of your battery and alternator with simple multimeter checks can extend their lifespan significantly.
Scaling Your Maintenance Efforts as Your Vehicle Ages
As your car ages, comprehensive system checks become essential. Upgrading to a professional-grade scan tool or integrating aftermarket modules for monitoring wheel alignment or brake wear can provide advanced oversight. For instance, installing a tire pressure monitoring sensor (TPMS) reader allows real-time alerts, preventing tire blowouts. As I plan for long-term vehicle ownership, I aim to develop a semi-annual diagnostic routine using my scanner alongside visual inspections, ensuring the vehicle remains reliable and safe.
How do I maintain my car’s integrity over time?
Getting familiar with a diagnostic scanner and having quality basic tools like a multimeter or fluid extractor makes huge difference. By establishing a regular maintenance schedule—driving awareness, timely fluid changes, and sensor checks—I aim to extend my vehicle’s lifespan and avoid costly repairs. For more detailed strategies, look at this comprehensive auto repair guide. Remember, staying proactive with diagnostics and tools now can save you thousands down the road. Try scheduling a diagnostic scan this month to identify any hidden issues lurking beneath the surface.
What I Didn’t Know About Small Impacts and Their Hidden Damage
One of the most eye-opening lessons I learned was that even minor collisions can have unseen effects on your vehicle’s safety systems and alignment. I used to dismiss slight bumps as insignificant, but now I realize that neglecting these minute issues can lead to long-term problems, from uneven tire wear to impaired safety features. Recognizing these subtle signs early has saved me from costly repairs and, more importantly, potential dangers on the road.
Tools and Resources That Changed My Maintenance Approach
Investing in quality diagnostic tools, like a reliable OBD-II scanner, transformed how I maintain my car. These devices provide real-time insights and help me catch issues before they escalate. Additionally, consulting trusted sources such as auto repair guides and professional service recommendations have empowered me to make informed decisions. Building a toolkit tailored for my vehicle has become a key to ongoing safety and peace of mind.
Stepping Up for Your Car’s Future
The road ahead is filled with opportunities to become a more confident, proactive vehicle owner. Regularly checking headlight alignment, staying on top of maintenance routines, and leveraging smart diagnostic tools can extend your car’s lifespan and keep you safe. Remember, it’s not just about fixing issues—it’s about cultivating a mindset of preventative care that pays dividends over time. Ready to embrace these habits and keep your vehicle performing at its best? Start today, and enjoy the journey with clarity and confidence.